Massachusetts Home Inspections YOUR INVESTMENT IS MY CONCERN

Insulation Upgrades

With the continuous rise in fuel costs, every Massachusetts homeowner should inspect their home's insulation to ensure energy dollars aren’t being wasted through the ceilings and walls. Surprisingly, despite insulation being relatively simple to install, exposed attics often pose the biggest challenges.
For Massachusetts homeowners who choose not to take advantage of the FREE energy assessment from MASSSAVE.COM, I’ll explain in detail how to properly and adequately insulate your home so you can save heating dollars.
So lets start with the exposed upper attic cavity....
In 80% of my home inspections throughout Massachusetts, I find that both insulation and ventilation are either improperly installed, poorly installed, or completely absent. Insufficient insulation can lead to significant heat loss into the attic and, more importantly, cause moisture buildup. This persistent moisture accumulation can eventually lead to serious mold issues. Many homes built before the early 1980s have inadequate insulation in the areas above, alongside, and below the living spaces. Proper insulation depth and a well-designed ventilation system in the attic are essential for optimal thermal efficiency and moisture control. Adequately ventilating the attic cavity also helps prolong the life of asphalt shingles on your roof. For these reasons, I will focus on explaining "HOW TO PROPERLY INSULATE AND VENTILATE YOUR ATTIC SPACE."
Before you begin insulating, always read the manufacturer's instructions for the insulation. Skipping steps or cutting corners could significantly reduce the R-value, wasting both time and money. Make sure you have enough insulation material to complete the entire job and allow yourself plenty of time to do it properly.
If you're using rolled insulation, DO NOT open the package until you've lifted the roll into the attic. The material will expand significantly once opened, making it much harder to handle. Always wear safety goggles, a dust mask or respirator, gloves, long sleeves, and long pants when working with insulation. Knee pads are also very helpful, especially if there is no flooring in the attic and you’re kneeling on the floor joists.
Be cautious while moving around in the attic. Watch for overhead rafters and protruding nails from the roof sheathing, and always walk on the floor joists or sturdy floorboards. If you step between the joists, you could fall through the ceiling below. If your attic doesn't have flooring, you can lay wood planks across the joists to walk or kneel on. Be sure the ends of the planks sit securely on the joists, not floating in between them. The spacing between joists typically ranges from 16 to 36 inches, so it's important to measure carefully and cut the planks to fit.
STEP 1
It’s crucial to ensure adequate ventilation is in place before or after installing insulation in your attic. Never cover any existing soffit vents, and make sure there is at least one inch of airflow between the insulation and the roof backing.
If your attic lacks adequate ventilation, I recommend hiring a roofing contractor to install roof vents on the high side of the roof—ideally, a ridge vent for gable roofs. Additionally, soffit vents or drip edge vents should be installed at the lower eave areas. To maintain proper airflow, soffit vents should be equipped with Styrofoam baffles (or proper venting materials) placed between the rafters and attached to the roof sheathing. These baffles direct airflow from the soffit area up into the attic.
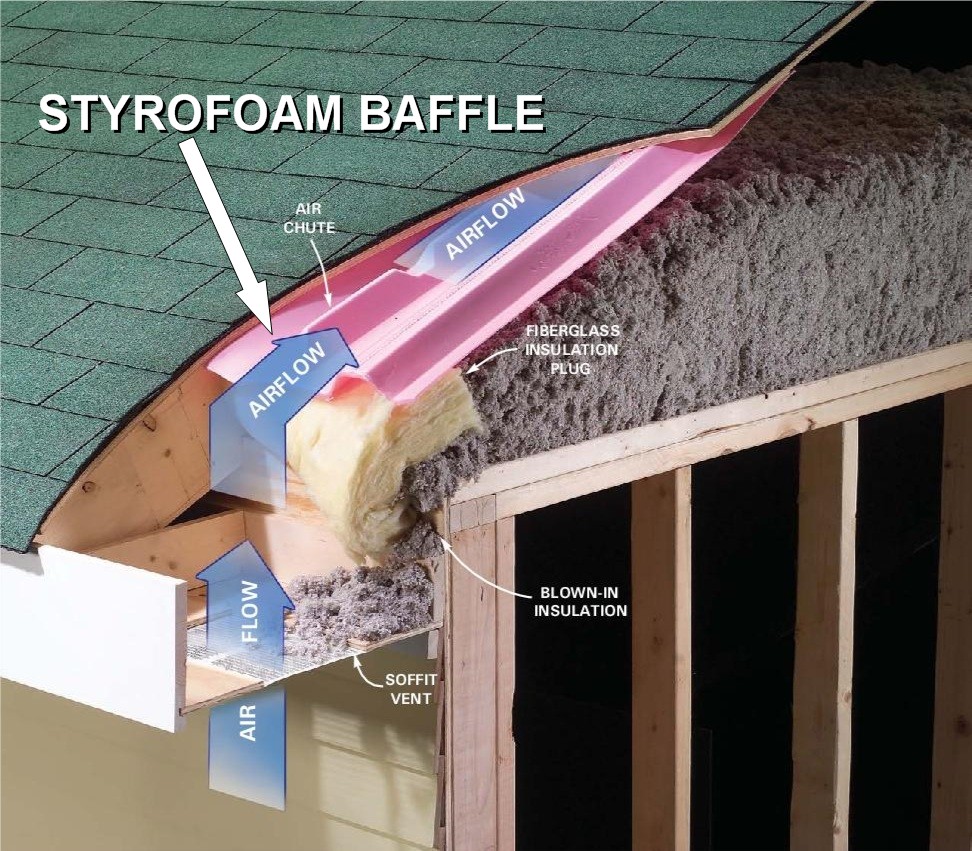
Styrofoam baffles are inexpensive and easy to install. Simply slide them into the soffit cavity next to the roof backing and staple them in place. It’s important to remember that insulation should never block the airflow from the soffit into the attic cavity. See image below.
STEP 2
HOW MUCH INSULATION DO YOU NEED?
If you purchased unfaced insulation, you’ll need to install a vapor retarder to prevent moisture damage. You can use pre-packaged vapor retarders or 4- to 6-millimeter polyethylene sheeting. Always place the vapor retarder on the warm side of the house. In attics, it should go beneath the insulation. If your insulation has a Kraft-paper or foil facing, position the paper facing downward toward the inner ceiling (the warm side of the home). However, only the first insulation layer should have this facing. For additional layers, use unfaced blanket insulation or blown-in insulating material. If you're using leftover faced insulation for additional layers, remove the paper from the facing to allow moisture to pass through.
When adding batts or blankets to enhance your attic’s R-value, use a utility knife to cut them to size. Install any second and third layers of blanket insulation perpendicular to the first layer. This helps create a tighter thermal barrier and minimizes air gaps.
STEP 3
While in your attic, inspect all recessed can lighting that protrudes through your ceiling from below. Some fixtures generate significant heat when in use, so it's important to keep insulation a safe distance away from their top and sides.
First, check whether the recessed lights have an "IC" (Insulation Contact) designation. IC-rated fixtures are designed to be in direct contact with insulation, allowing you to insulate around and over them safely. If the lights are not IC-rated, consider replacing them with IC-rated fixtures or flush mount led lighting (which will require ceiling patching), especially in areas requiring insulation. Non-IC fixtures can be repurposed in locations where insulation isn’t needed.
If replacing the fixtures isn't an option, create a protective barrier using 1" x 4" or 1" x 6" wood boards around each non-IC fixture. Keep insulation at least three inches away from these fixtures and maintain clearance around fire-block areas near chimneys.
Non-IC fixtures generate excess heat under a snow-covered roof, often contributing to ice dam formation. From my experience inspecting homes in Massachusetts, I always recommend upgrading to IC-rated recessed lighting, especially in cathedral ceilings. This allows insulation to be placed directly over the fixtures, reducing heat loss and preventing exterior ice dam buildup.
STEP 4
Fully insulate your attic access area to maintain energy efficiency. The key principle to remember is that any surface separating conditioned (heated or cooled) living spaces from unconditioned areas must be properly insulated.
In an unheated attic, the attic-side floor cavities should be insulated like this, as they serve as the barrier between the conditioned space below and the unconditioned attic above.
In finished attics, knee spaces (the open areas behind the short walls) should be insulated at all exterior stud cavities and within the floor cavities beyond the knee wall like this. Behind this knee wall, the insulation should not be placed between the roof rafters. Insulate floor cavities only. I frequently find improper insulation in this area during home inspections.
A finished attic space should be insulated one way, while an unfinished attic cavity requires a different approach. Refer to the diagram at the bottom of this webpage for a visual guide.
Also...See the full diagram below.
STEP 5
If your attic access is comprised of a pull down stairway or a scuttle hole opening, this area must be fully insulated to reduce cold air from infiltrating your conditioned space and to prevent heat loss through this passageway. There are manufactured insulation boxes sold at Home Depot or Lowes. Or...If you want to save $$$ and your good at utilizing a tape measure and you have good cutting skills with a utility knife, you can fabricate your own insulated box with rigid foam boards and aluminum tape. See a finished insulation cover here. Then apply a thick foam tape to the bottom edge of this cover and tighten this down snug with velcro and retainers to ensure air gaps are fully sealed.
NOTE: If you’re hiring a professional to install blown-in (loose-fill) insulation in your attic, ensure they distribute it evenly across the entire unconditioned attic space (see Step 4). Any gaps, uneven coverage, or variations in depth will reduce the insulation’s effectiveness and lower the R-value. Additionally, confirm that insulation is not being blown into soffit vents or baffles, as this can obstruct proper attic ventilation. For optimal energy efficiency in Massachusetts' climate, aim for 12–14 inches of blanket insulation or 9–10 inches of loose-fill insulation, achieving an R-39 value.
Upgrading Whole House Insulation
NOTE: Most wall and ceiling insulation is not visible, but this concealed insulation can be easily detected by having a Professional Infrared Scan performed by myself.
The diagram below is a perfectly insulated home. Let's start at the top and work our way down...
1 - In UNFINISHED attic spaces, insulate between and over the top of all floor joists in order to seal off all the living spaces below.
1A - Attic access opening.
In FINISHED attics (with rooms) with or without a dormer, insulate the following...
2A - Between the stud cavities outside of all knee walls.
2B - Between the studs and rafters of exterior walls and roof backing. Do not block soffit vents or compress baffles.
2C - Ceiling joist cavities usually need an additional layer of insulation installed on top of and perpendicular to the existing insulation. (See Step #2 above.)
2D - Extend the insulation right into the joist space (under living area) to reduce any air flows.
Insulate all exterior walls, including ...
3A - All exterior Wall stud cavities between living spaces and unheated garages, shed roofs, or storage areas.
3B - Exterior stud cavities of cripple walls sitting on top of the foundation.
3C - All masonry foundation walls in heated basements. Rigid board foam can be applied to either the interior or the exterior portion of the foundation. This material is must protected by a fire rated material.
4 - All floor joist cavities above cold spaces, such as crawl spaces, sun rooms and unheated garages.
4A - All outer floor joist cavities (in a room) that are cantilevered out beyond an exterior conditioned wall below.
4B - See #4 (above)
4C - As an alternative to floor insulation, you can insulate the foundation walls of an unventilated crawl space.
4D - Extend insulation into joist space (under the living area) to reduce any air flows.
5 - All Band or Rim Joists throughout the exterior wall.
6 - To finalize the efficiency of your home, replace any single pane windows with Thermal Pane windows and caulk and seal around every window and door trim piece.
Here is what my clients have to say about my home inspection services:
Press F5 (on your keyboard) for additional testimonials
As a first time home buyer, a home inspection was very intimidating. Dave Valley made me feel at ease as soon as I met him. He was very professional, thorough, and explained things to me as we went along. Overall, what I expected to be a stressful experience was very easy because of Dave.
Christine


- Home
- Types Of Home Inspections
- Why Choose Me?
- What Do I Inspect
- Aerial Drone Inspections
- Areas I Serve
- Guide to a Healthy Home
- Higher Standards
- Client Testimonials
- Standards of Practice
- Support Our Military
- Glossary - A thru H
- Glossary - I thru Z
- Purchasing A Home
- Selling Your Home
- Get Your Home Sold Fast
- Know Your Home
- Pricing For Services
- Optional Services
- Most Common Defects
- Frequently Asked Questions
- Home Inspection Report
- Home Maintenance
- Moving Tips
- Images Of Defects
- A Safer Home
- Contact Me
Areas Served
MASSACHUSETTSCities and towns throughout Eastern Massachusetts, primarily focusing on ESSEX, MIDDLESEX, NORFOLK, SUFFOLK, and WORCESTER counties, including:


![]()