Massachusetts Home Inspections YOUR INVESTMENT IS MY CONCERN

Dry Well Installation
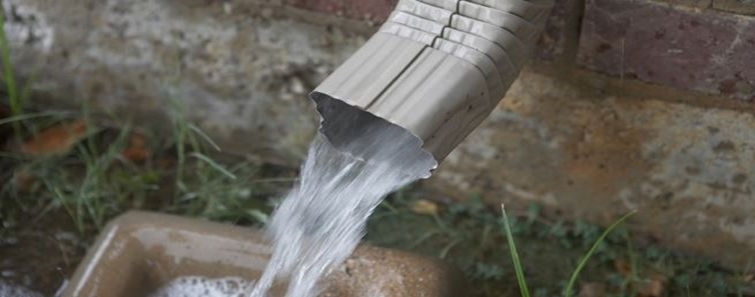
Over the years of inspecting thousands of homes in Massachusetts, I’ve encountered numerous properties with roof water drainage issues. Many homes have gutters with downspouts that direct water right next to the foundation. This improper installation is causing foundation damage and excessive seepage at the inside corners of basements. Installing extensions on these downspouts can often solve the issue by directing water away from the foundation, helping to prevent further basement seepage.
However, most Massachusetts homeowners dislike the appearance of long, sloped downspout extensions at the corners of their homes. These extensions can disrupt the aesthetics of landscaping and become an obstacle when mowing or maintaining the lawn. Additionally, there are many situations where a walkway or driveway prevents the installation of downspout extensions, as you can’t run them across these busy areas. The solution, especially for homes with more land space, is a Dry Well. This system allows you to manage roof water drainage without compromising the appearance or functionality of your property.
I’m going to explain how to properly design an efficient dry well that can handle most of your roof water, helping to eliminate problematic puddling next to your foundation and reduce excessive seepage into your basement.
The first step is to prepare for the installation. The tools you'll need for your dry well installation include the following…
4” PVC Piping (Solid)
4” PVC Piping (Perforated)
A PVC downspout adapter, elbows, and any other necessary fittings, hardware, and adhesive required to connect your existing downspout to the PVC drainage pipes.
PVC handsaw or a hacksaw
Landscaping fabric (quantity will vary)
Long handled Shovel
Lots of ½ to ¾ inch Washed Stone
A Dry Well Shell with holes
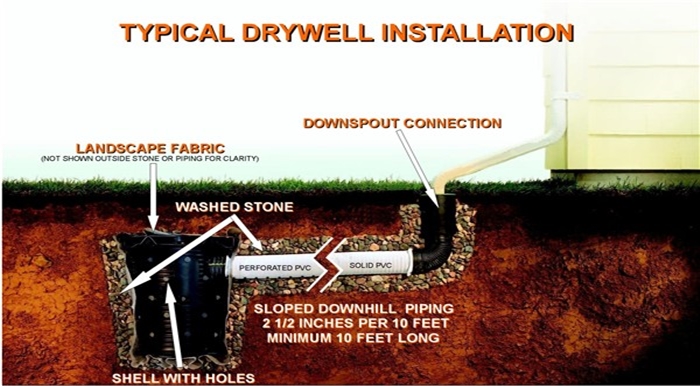
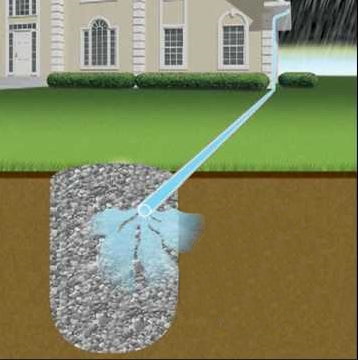
Essentially, you'll be constructing your dry well by excavating trenches away from your home and filling them with washed stone and PVC piping. This setup will create a direct path from your house’s downspouts to the underground pipes, which will carry the roof water to the dry well. This system allows the roof water to be redirected away from your foundation and stored in the voids of the ground, all without disrupting the appearance of your landscaping or obstructing high-traffic areas.
The first step you must take for your dry well installation is to make sure seamless aluminum (or copper) gutters and downspouts are installed at all sloped roof edges of your home. I recommend not installing those cheap vinyl gutters and downspouts as they bend easily and crack in our extreme winter weather. These simply cause more problems than their worth. Please stay away from cheap vinyl gutters and downspouts.
Alright, let's get started. First, choose a suitable location for the dry well. It should be well away from your home's foundation—at least ten feet—and positioned downhill from the house. On a rainy day, grab your umbrella and walk around the perimeter of your property to observe which way the rainwater flows. A good location for your dry well will be in an area where the water naturally flows downhill. Mark these spots with stakes. If there is a high water table or puddling in any area, that location cannot be used for the dry well.
Once you've marked your locations, grab a heavy-duty tape measure and measure the distance from your foundation to the area where you want to place the dry well shell/pit. This measurement will help determine how much PVC piping you'll need for the installation. PVC drainpipes typically come in 10-foot lengths and can be found at your local building supply store. A 4-inch diameter pipe is ideal. You’ll need three types of pipe: solid PVC drainpipe (with no holes), perforated PVC drainpipe (with holes), and a PVC elbow for each location. The solid PVC pipe and elbows will be installed at the downspout termination areas to direct the roof water to the perforated pipe, which will begin dispersing the water underground before it reaches the dry well. If the pipe needs to pass underneath a driveway, consult local codes for the appropriate type of pipe, as it must be stronger than standard PVC pipe.
Next, lay burlap alongside the area where you'll be digging the trench. This will serve as a guide to help you dig a straight trench and provide a convenient spot to shovel the dirt onto, making cleanup and refilling the trench much easier.
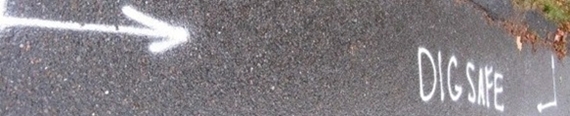
After contacting and verifying utility locations with Dig Safe, use a long-handled shovel to begin digging the trench to a depth of about 12 inches. Pile the dirt on top of the burlap as you go. If you’re digging through a well-established lawn, you can neatly edge both sides of the trench first using a spade, turf cutter, or square-blade shovel. If done carefully, you can remove sections of the lawn and replace them over the excavation once the trench is filled. Alternatively, you could reseed the entire disturbed area.
Install the downspout adapter, elbows, and any other necessary fittings to connect your existing downspout to the PVC drainage pipe. If you need to cut small sections of pipe, use a handsaw designed for cutting PVC or a hacksaw. Depending on the situation, you may need to screw or glue above-grade joints together to prevent disconnection. Joints below grade do not require fastening.
Now, start laying the solid lengths of PVC pipe into the trench. Use a level to check the slope at several points, ensuring the pipe is sloping away from the house. The pipe should slope at least 1/4 inch per foot of run (so one end of a 10-foot pipe should be 2 1/2 inches lower than the other). Install any remaining solid lengths of PVC pipe as needed, then cover the pipe with the dirt from the burlap and tamp it down firmly.
Continue digging the trench for the perforated sections of pipe, making it a few inches deeper to accommodate a two-inch stone bed. Before installing the perforated pipe, line the trench with landscaping fabric, ensuring the edges overlap. Then, pour two inches of washed stone into the base of the trench.
Lay the perforated pipes into the trench, placing them on top of the washed stone with the holes facing down, while maintaining the 1/4-inch-per-foot slope. Next, wrap landscaping fabric over the top of the pipe, letting it drape over the sides with the edges overlapping. This fabric will prevent dirt from entering and clogging the holes in the perforated pipe. Then, pour additional stone around the sides of the perforated pipe, ensuring the fabric stays against the pipe. Once this is done, cover the area with dirt and tamp it down.
Important: Leave the last perforated pipe connection off so you can connect it to the dry well shell once it's installed into the pit.
Now, dig a deep hole for the dry well at your chosen location. The bottom of the dry well should never be less than two feet above the peak water table level, which is typically highest in the spring. If the water table starts to accumulate in the hole as you're digging, it means the location is not suitable for a dry well, as it will simply become a storage area for groundwater.
In Massachusetts, the top of your dry well should be recessed 36 to 42 inches below grade, with a maximum depth of 10 feet, to prevent draining water from freezing and backing up through the drainage pipes, which could cause water to flow back toward the foundation. This would defeat the purpose of the dry well. The width of the pit should be 4 to 5 feet square. If there are underground utilities nearby, the top of the dry well must be positioned at least three to four feet below grade.
Once the pit is dug to size, smooth out the bottom and remove any loose dirt. Next, carefully line the entire hole with landscaping fabric, ensuring you drape enough fabric over the top to help hold it in place. You will use this excess fabric later to cover the stone. (Remember to overlap the fabric at all edges.) Then, pour in a layer of washed stone, 4 to 6 inches deep, and smooth it out evenly.
Set the dry well shell into place and connect the final section of the perforated PVC drainpipe. The end of the pipe should extend about 6 inches into the shell. Next, install the overflow valve according to the manufacturer's instructions. You can also insert a perforated observation pipe vertically into the dry well for future inspection and maintenance. Finally, attach the dry well cover to the shell.
Fill in around the entire dry well shell with additional washed stone. Depending on the type of dry well and the size of the drainage gravel you're using, you may need to wrap the shell with landscaping fabric before backfilling with gravel. Be sure to follow the manufacturer's recommendations. Next, take the draped fabric at the top of the hole and wrap it over the washed gravel. Then, backfill the dry well area with at least 1 foot of soil cover over the top, and finish backfilling the remaining piped section with dirt, tamping it all down firmly.
Remove any excess dirt for reuse elsewhere. Reseed and water the bare areas as necessary or if you saved sections of grass, you are now ready to replace that grass now.
You can now you can relax during those heavy rain showers.
Here is what my clients have to say about my home inspection services:
Press F5 (on your keyboard) for additional testimonials
As a first time home buyer, a home inspection was very intimidating. Dave Valley made me feel at ease as soon as I met him. He was very professional, thorough, and explained things to me as we went along. Overall, what I expected to be a stressful experience was very easy because of Dave.
Christine


- Home
- Types Of Home Inspections
- Why Choose Me?
- What Do I Inspect
- Aerial Drone Inspections
- Areas I Serve
- Guide to a Healthy Home
- Higher Standards
- Client Testimonials
- Standards of Practice
- Support Our Military
- Glossary - A thru H
- Glossary - I thru Z
- Purchasing A Home
- Selling Your Home
- Get Your Home Sold Fast
- Know Your Home
- Pricing For Services
- Optional Services
- Most Common Defects
- Frequently Asked Questions
- Home Inspection Report
- Home Maintenance
- Moving Tips
- Images Of Defects
- A Safer Home
- Contact Me
Areas Served
MASSACHUSETTSCities and towns throughout Eastern Massachusetts, primarily focusing on ESSEX, MIDDLESEX, NORFOLK, SUFFOLK, and WORCESTER counties, including:


![]()