Massachusetts Home Inspections YOUR INVESTMENT IS MY CONCERN

Crawl Spaces
VENTING CRAWLSPACE
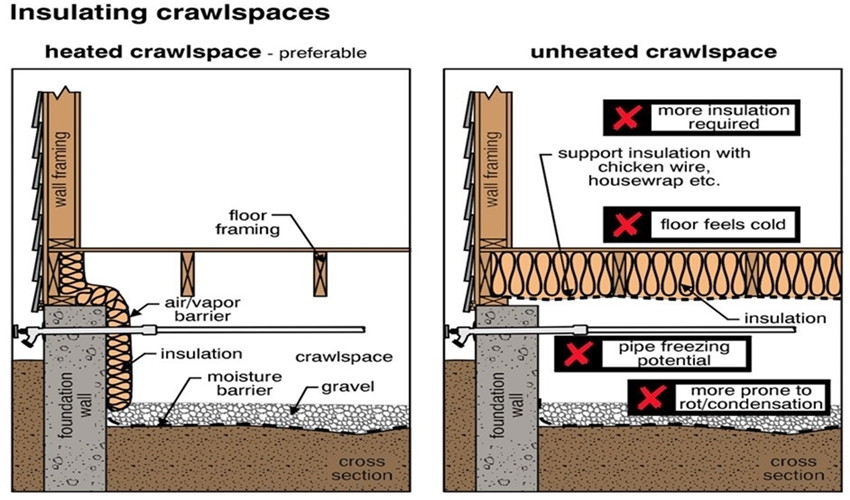
While crawlspace venting is sometimes recommended or even required in certain areas as a way to protect the floor system, it can actually cause more problems than expected, especially in Massachusetts' climate. In our region, vents in crawl spaces often lead to higher moisture levels, which can increase heating and cooling loads, resulting in inefficiencies. Moreover, vented crawl spaces are vulnerable to high humidity during the summer, creating conditions that promote moisture issues, mold growth, and attract termites. In New England homes with crawl spaces, it's generally better to eliminate vents and condition the space entirely. This approach helps create a stable environment, similar to that of a traditional full basement. Before I discuss how to properly condition a moist crawl space, let me first explain why crawlspace vents are not suitable for our unpredictable weather.
In the frigid Massachusetts winters, open vents in crawl spaces can infiltrate the upper living areas with freezing cold air. This cold air can make walking barefoot on the floors above the crawl space uncomfortable, if not unbearable. Additionally, cold air circulating through vented crawl spaces is ineffective at evaporating foundation moisture. While excessive venting might freeze the soil, which would suppress water vapor and biological activity, it also poses a risk to plumbing pipes. These pipes could freeze and burst under such conditions. I’ve seen many nightmare situations like this during home inspections, but after offering my suggestions, new homeowners are now enjoying a warmer, more comfortable living space above their crawl spaces.
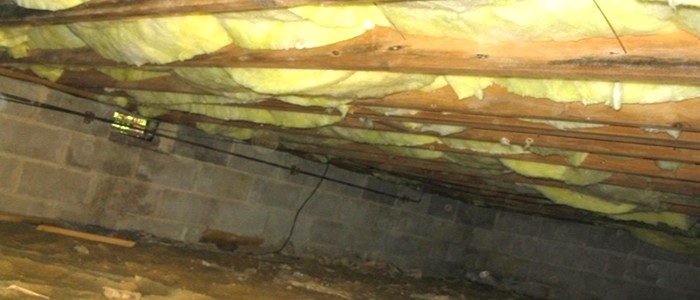
Another reason I strongly discourage vents in crawl spaces is due to the humid New England summers, when the hot ambient air is saturated with unwanted moisture. When this air enters a cool crawl space through the vents, the water vapor must condense. This causes moisture to accumulate on all available surfaces—the foundation, soil or masonry floor, insulation blankets (which can become heavy and fall out of the joist cavities), and the wooden floor structure above. For instance, if 80-degree air is allowed to enter a 60-degree crawl space, the air will reach saturation, resulting in excessive indoor dew on the crawl space surfaces. This creates ideal conditions for fungi to thrive, which is harmful to both the house and its occupants. Soaking the wooden components near the foundation leads to wood rot and attracts wood-boring insects. Over time, this situation turns into a breeding ground for serious structural and indoor air quality issues.
It is now widely recognized that a major source of crawl space moisture comes from evaporation from uncovered soil beneath the house. Preventing this evaporation is crucial to keeping the crawl space dry. For this reason, I strongly recommend upgrading your Massachusetts crawl space to a conditioned crawl space.
HOW TO PROPERLY CONDITION YOUR CRAWLSPACE (IN MASSACHUSETTS)
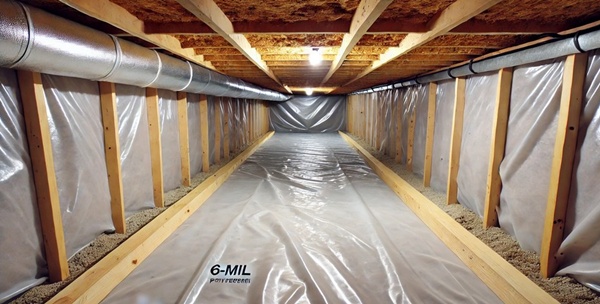
The first step in properly conditioning your cold, musty crawl space is to carefully install 6-mil polyethylene sheeting across the entire dirt floor area. After spreading the plastic out evenly, smooth it as much as possible, ensuring there are no wrinkles. Most importantly, overlap the seams by about 1 to 2 feet. Next, lap the edges of the poly up the foundation walls about two feet. Secure the seams tightly with heavy-duty contractor’s tape.
This polyethylene barrier will immediately create a cleaner, drier space, allowing you to move around without getting dirty. Then, install strips of pressure-treated lumber along the top outer edges of the plastic. Attach the wood strips to the poly (or up to two feet up the foundation walls) using masonry nails or screws. If using screws, you'll need a hammer drill and masonry bit to secure the strips to the foundation. Once the strips are in place, trim any excess plastic that extends beyond the wood. Finally, apply a bead of standard silicone around the top of the wood strips to seal the installation and complete the job.
Now, place objects such as stones, bricks, sand, or similar materials along the top and outer edges of the barrier to weigh it down. This creates a moisture-resistant, conditioned space that effectively blocks the water vapor, which is fueling the growth of offensive aromatic microscopic mold in your home above the barrier.
With the poly laid out and all seams taped, you now have a clean, organized area that's comfortable to crawl around in. Next, we’ll focus on insulating the interior perimeter crawlspace walls, transforming your crawl space into a well-sealed, insulated chamber that enhances the thermal protection for the floor above.
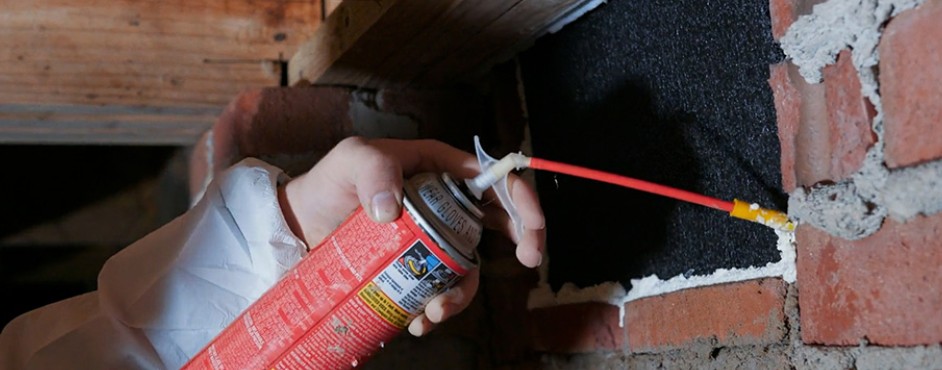
First, permanently close and seal all crawl space foundation vents. You can do this by filling the vents with rigid board insulation, cutting it to fit snugly into the openings. Next, insulate the exterior perimeter of the crawl space foundation. This will help save energy, reduce drafts, and make your home more comfortable throughout the year. You have two insulation options: One is to glue 1- or 2-inch thick rigid foam insulation sheets to the interior sides of the foundation walls around the entire perimeter. Keep in mind, however, that plastic foam boards are combustible and must be covered with a fire-retardant material after installation.
If you choose this method, protect the insulation by covering it with a coat of stucco or another appropriate protective coating. Be sure to leave a 6-inch gap between the insulation and any wooden foundation elements above to allow for termite inspections.
The second insulation option is to use blanket insulation. Measure and cut lengths of insulation to extend from the upper mud sill area, then drape it down the entire wall, with 2 feet of it rolled out over the protected dirt floor.
Secure the insulation blankets with 1" or 2" cleats. Position the cleat over the end of the insulation, then drive galvanized nails or screws through the cleat and into the edge of the mud sill. Next, place a length of 2x4 or a few bricks along the bottom of the wall to hold the insulation in place. Afterward, measure and cut square pieces of insulation to fit between the joist cavities, above the foundation and sill plate. Carefully insert these square pieces into the ends of the floor joists, against the rim joist, without compressing the insulation. Be sure to insulate every water supply pipe, waste pipe, and heating duct in the crawl space as well.
Once your crawl space is fully insulated, you can either leave it as is or treat it like any other space in the house. You can supply it with a small amount of heat from your heating system. Depending on your heat source, either have a licensed HVAC technician install a small supply duct to the space or a licensed plumber add a small baseboard heater or a licensed electrician install a small electric heater. The heat source doesn't need to be significant, as the crawl space is not a living area, and cold air will no longer circulate through it. The goal is simply to prevent uncomfortable cold floors and to protect plumbing pipes from freezing.
Now that I've shown you how to upgrade your Massachusetts crawl space, it's time to focus on taking care of the rest of your home.
Here is what my clients have to say about my home inspection services:
Press F5 (on your keyboard) for additional testimonials
Hi Dave,
Just wanted to send you a note of appreciation related to our home inspection at 14 Sunset Rock. We found your approach to be thorough, with great attention to detail, along with balanced and very practical advice. We are very pleased with your work!
Regards,
John


- Home
- Types Of Home Inspections
- Why Choose Me?
- What Do I Inspect
- Aerial Drone Inspections
- Areas I Serve
- Guide to a Healthy Home
- Higher Standards
- Client Testimonials
- Standards of Practice
- Support Our Military
- Glossary - A thru H
- Glossary - I thru Z
- Purchasing A Home
- Selling Your Home
- Get Your Home Sold Fast
- Know Your Home
- Pricing For Services
- Optional Services
- Most Common Defects
- Frequently Asked Questions
- Home Inspection Report
- Home Maintenance
- Moving Tips
- Images Of Defects
- A Safer Home
- Contact Me
Areas Served
MASSACHUSETTSCities and towns throughout Eastern Massachusetts, primarily focusing on ESSEX, MIDDLESEX, NORFOLK, SUFFOLK, and WORCESTER counties, including:


![]()