Massachusetts Home Inspections YOUR INVESTMENT IS MY CONCERN

Cracked Surfaces
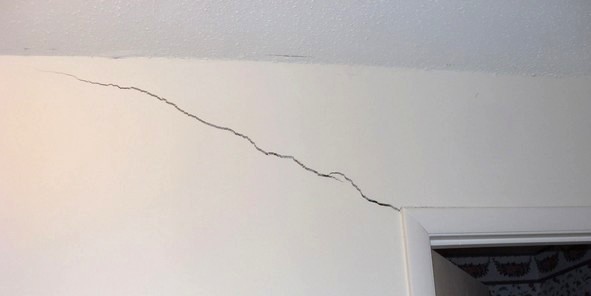
The most common cracks in Massachusetts homes are generally classified as hairline cracks, typically less than one-eighth inch wide or under twelve inches in length. Concrete, plaster, drywall, and stucco are all prone to cracking as they naturally shrink, dry, cure, and age. These types of cracks are commonly referred to as shrinkage cracks. Shrinkage cracks can develop at any time throughout the lifespan of a structure. They often appear diagonally, extending from the top outside corners of doors and windows. While their presence may be noticeable, these cracks are usually of minimal concern.
Major cracks are typically defined as those wider than one-eighth inch, longer than twelve inches, excessive in number, or displaying unusual patterns such as stair-step, V-shaped, X-shaped, straight horizontal, or displaced cracks. Additionally, cracks located in unexpected areas, like the middle of a wall without nearby doors or windows, may also be considered major. If major cracks are present or develop, it is advisable to seek further evaluation from a qualified structural engineer specializing in foundations and structures. In many cases, major cracks result from prolonged homeowner neglect or a lack of timely maintenance when smaller, more common cracks first appear. Left unaddressed, minor cracks can progress into significant structural issues.
To prevent further deterioration, cracks and the surrounding areas should be properly repaired and regularly monitored, particularly during periods of heavy rain or freezing temperatures. Any signs of additional damage should be promptly assessed by a qualified structural engineer.
If you're not familiar with common cracks, it's advisable to consult a qualified structural engineer for further evaluation and advice. Major settlement cracks, especially those in the foundation, walls, ceilings, and/or attached porches/patios, should be inspected before the close of escrow to protect your investment. Cracks in driveways, walkways, and other exterior areas are typically cosmetic rather than signs of critical failure but should still be assessed by a professional. I strongly recommend repairing or replacing affected components and consistently monitoring and maintaining cracks by sealing and weatherproofing them to prevent further damage and accelerated deterioration.
While you might be willing to accept a house with a higher number of cracks, future buyers may not share the same view and could require repairs, potentially leading to additional damage from ongoing neglect. It's in your best interest to address both common and significant cracks promptly to avoid more extensive issues down the line.
OLD PLASTER WALL CRACKS
If you've ever owned an older home in Massachusetts, you're likely familiar with both the advantages and disadvantages of old plaster walls. Their durability, smooth finish, excellent soundproofing, and substantial mass make them an appealing choice. However, the primary drawback of plaster walls is their tendency to crack and loosen over time, often reacting to stress much like glass.
Plaster damage is a common issue, and unlike drywall, it is difficult to achieve a lasting repair with a simple patch. While there are multiple methods to address these imperfections, it’s important to recognize that most plaster repairs are temporary solutions. Due to the material’s inherent vulnerability to cracking and loosening, ongoing maintenance can become a frustrating and repetitive task.
When a section of plaster breaks away, it typically compromises the surrounding areas as well. Because the plaster is no longer securely “keyed” into the lath, repairs often require the removal of all adjacent loose plaster within a 6 to 12-inch radius from the damaged area. This ensures the repair is anchored to the remaining, intact plaster that is still firmly bonded to the lath.
Plaster in older homes can sustain damage from the everyday stresses of household activity. Hanging artwork, moving furniture, and children playing can all result in scratches, holes, and surface wear. Spilled liquids on upper floors may seep through to plaster ceilings below, causing staining and weakening. Additionally, water damage from roof leaks or plumbing issues can soften the plaster keys, leading to detachment from the lath. In severe cases, this can create a noticeable bulging or "belly" effect. Some older plaster may also suffer from poor-quality materials or workmanship, making it more prone to cracking and crumbling over time. There are numerous options available for upgrading plaster walls, and I'd be happy to share them with you.
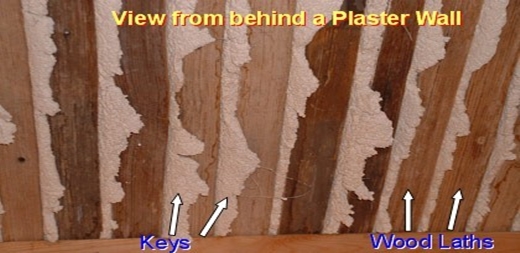
First and foremost, when viewed from behind, a typical plaster wall consists of plaster applied over wooden laths. The plaster is held in place by "keys" that form as it squeezes through the gaps between the laths. Over time, these keys can deteriorate, leading to cracks, crumbling, and sections of plaster detaching from the lath. House settling and moisture can accelerate this process, further compromising the integrity of the plaster walls and ceilings.
MINOR PLASTER CRACK REPAIRS
Minor cracks in plaster walls are common in older buildings and can be difficult to repair with traditional drywall patching methods. For an effective and lasting solution, I highly recommend using NU-WAL. This is a DIY-friendly system that involves embedding a fine-textured fiberglass mat into an elastomeric adhesive. The acrylic binder creates a durable surface that resists future impacts and abrasions. Applying NU-WAL over cracked plaster not only conceals the damage but also helps stabilize and reinforce the entire wall. Once the material has dried, the surface can be painted or wallpapered, providing a seamless and polished finish.
MAJOR PLASTER CRACK REPAIRS
When dealing with severely damaged plaster walls, you have two options to consider:
1) One option is to remove all the plaster and laths, taking the walls or ceilings down to the studs or joists. Keep in mind that this is a labor-intensive process, and the work area will become extremely dirty and dusty. To make cleanup easier, start by laying a painter’s floor cloth or a similar protective material. This will allow you to gather and carry out smaller sections of plaster for disposal, reducing dust spread. Once all the plaster and wood laths have been removed and the area is thoroughly cleaned and swept, the messy part of the job will be complete. With a clean slate, you can proceed with a standard drywall installation.
Before installing drywall, ensure that all studs are spaced according to today’s standard of 16 inches on center. In many older homes, stud spacing can range from 16 to 36 inches, which is too wide for proper drywall support. To create a stronger and more stable wall, install additional studs between the existing ones as needed. During demolition, workers should wear OSHA-approved masks to protect against airborne particles. Plaster dust from older homes may contain coal soot and traces of lead from lead-based paint. Additionally, long-sleeved clothing and head-and-eye protection are essential for safety. If the home was built or renovated during the mid-20th century, asbestos may also be present, particularly in plaster used for fireproofing or insulation. Always follow OSHA-recommended precautions when dealing with potential asbestos exposure.
2)Another option is to leave the damaged plaster in place and cover the walls or ceilings with ¼-inch drywall. While this method won't result in perfectly straight or flat surfaces, it significantly simplifies the upgrade process. Start by removing all wood trim from the all edges of the walls, ceilings, and windows. This prevents the reveals around these areas from becoming too thin once the new drywall is installed. If any sections of plaster are loose or bulging, use plaster washers to secure the damaged plaster back to the laths, ensuring a more stable surface for the drywall application.
If you're upgrading a plaster ceiling and notice any sagging areas, it's crucial to remove the sagging portions and fill the voids with sections of drywall. Simply applying drywall over a sagging ceiling is dangerous, as the weight of the plaster will cause the drywall to continue sagging. In the worst case, the ceiling could collapse. Once all the plaster is secure and the voids are filled, you can proceed with installing drywall sheets over the plaster walls or ceiling. Make sure to properly secure the drywall using drywall screws into the studded areas only to ensure a stable and safe installation.
Avoid screwing into the laths, as they won’t provide a secure hold for the drywall. It's best to mark the stud locations on the plaster walls that you're covering. Once the drywall is fully installed throughout the room, you're ready for the finishing work. If you don't have experience with joint compound and sanding drywall seams, it’s a good idea to hire a professional drywall installer. Properly applied and sanded joint compound is crucial—if done poorly, the imperfections will become visible once you paint. By then, it will be too late to correct the mistakes, leaving you with uneven, scratched surfaces that weren’t noticeable before painting.
If the plaster walls are slightly wavy or have an uneven texture, you might consider applying a highly textured wall covering, such as Lincrusta or Anaglypta. These wall coverings feature intricate patterns and deep textures that can effectively conceal imperfections while adding visual appeal when applied correctly. Good luck with your renovation!
Here is what my clients have to say about my home inspection services:
Press F5 (on your keyboard) for additional testimonials
Hi Dave,
I just wanted to write and thank you very much for doing our inspection today. You really took an awful lot of extra time to explain things to us. It was a huge help and by far my favorite part of this whole home-buying process. In addition to drawing our attention to the major projects that need to be undertaken right away or in the near future, I was glad that you were also so thorough as to point out smaller things and provide suggestions for fixes that we'd be able to do ourselves. Thanks again for all your effort. I'm finding your "Know Your Home" book a great source of information along with your report. I'll no doubt have some questions for you at some point and really appreciate your willingness to answer them. Have a great rest of your weekend!
Take care,
Sean


- Home
- Types Of Home Inspections
- Why Choose Me?
- What Do I Inspect
- Aerial Drone Inspections
- Areas I Serve
- Guide to a Healthy Home
- Higher Standards
- Client Testimonials
- Standards of Practice
- Support Our Military
- Glossary - A thru H
- Glossary - I thru Z
- Purchasing A Home
- Selling Your Home
- Get Your Home Sold Fast
- Know Your Home
- Pricing For Services
- Optional Services
- Most Common Defects
- Frequently Asked Questions
- Home Inspection Report
- Home Maintenance
- Moving Tips
- Images Of Defects
- A Safer Home
- Contact Me
Areas Served
MASSACHUSETTSCities and towns throughout Eastern Massachusetts, primarily focusing on ESSEX, MIDDLESEX, NORFOLK, SUFFOLK, and WORCESTER counties, including:


![]()