Massachusetts Home Inspections YOUR INVESTMENT IS MY CONCERN

Foundation Maintenance
Your foundation is the backbone of your home, supporting the floors, walls, and roof framing. It also plays a critical role in keeping floors level, maintaining a dry basement, and ensuring windows and doors operate smoothly. A well-maintained foundation provides stability and longevity to your entire structure. Proper foundation maintenance is essential to prevent structural issues that can develop gradually and lead to costly damage. The primary step in maintaining your foundation is to address any exterior moisture problems that may be contributing to basement water intrusion (See Wet Basements). By effectively diverting water away from your foundation, you significantly reduce the risk of foundation deterioration. Once exterior water management is in place, the bulk of your foundation maintenance is complete.
Residential foundations are typically constructed using materials chosen for their strength, durability, and resistance to environmental conditions. The most common foundation materials in Massachusetts include poured concrete, fieldstone, bricks and blocks and slab on grade.
POURED CONCRETE FOUNDATION
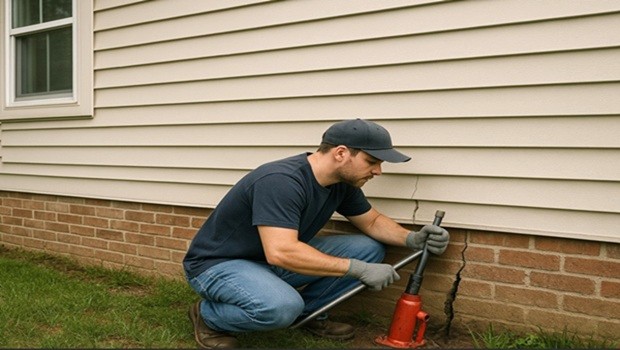
The most common material for Massachusetts residential foundations due to its durability and strength. It’s ideal for slabs, crawl spaces, and basements. While poured concrete is incredibly durable, it’s not immune to damage. Over time, even concrete can crack, chip, or crumble, especially under the stress of our New England harsh temperature fluctuations. The freeze/thaw cycles of winter are particularly tough on concrete structures. I recommend inspecting your concrete and masonry walls, slabs, and foundations regularly — early spring is an ideal time to assess any damage caused by winter weather.
Cracks, chips, and flaking areas are not only unsightly but can also lead to further deterioration. Left unaddressed, these issues can allow moisture infiltration, resulting in more extensive damage and costly repairs. Timely maintenance, such as applying a parge coat of lime-based mortar over spalled or chipped areas, can help preserve your foundation and prevent further degradation.
For hairline cracks, monitoring is often the best initial approach. An easy and effective method is to use a small piece of glass. Secure the glass over the crack using epoxy at both ends, ensuring it spans across the crack. Take precautions to protect it from accidental damage. If the glass remains intact, the foundation is likely stable. However, if the glass breaks, it indicates continued movement, and consultation with a structural engineer is advisable.
If you notice water stains near interior foundation cracks, it’s essential to address any exterior drainage issues first (refer to Wet Basements. Properly directing water away from the foundation often resolves minor seepage problems. If water continues to infiltrate after drainage corrections, an epoxy injection may be necessary. This technique effectively seals cracks and prevents further moisture intrusion, ensuring the longevity of your foundation.
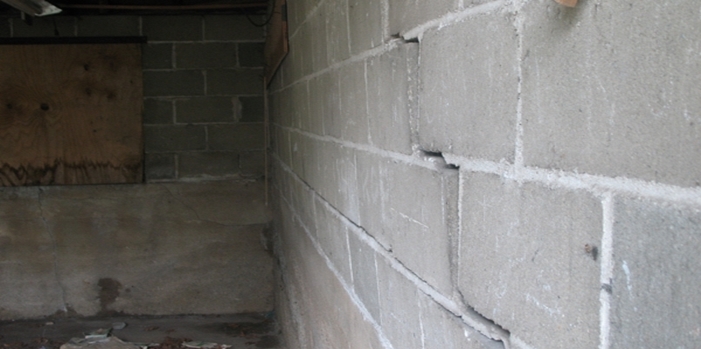
CONCRETE BLOCKS (CMUs)
Concrete masonry units are often used for basement and crawl space walls. They are more affordable than poured concrete but may require additional reinforcement with steel rebar and concrete filling for added strength. These blocks are stacked in a staggered pattern, referred to as a running bond, to increase stability to create strong, durable walls that provide support for a home or other structure. They are available in various sizes, with the most common being 8 inches by 8 inches by 16 inches. Concrete blocks are resilient to wear and tear, making them a long-lasting choice.
Potential Drawbacks are...
• Moisture Penetration: If not properly sealed, the porous nature of concrete blocks can allow water to seep through.
• Structural Weakness: Compared to solid poured concrete, block foundations are more susceptible to lateral pressure and cracking throughout the joints.
• Maintenance Requirements: Regular inspections are necessary to detect cracks, efflorescence (white mineral deposits), or mortar deterioration.
A CMU block foundation is a reliable and cost-effective choice for supporting residential structures. With proper construction, reinforcement, and ongoing maintenance, it provides excellent stability and durability. However, ensuring good drainage and applying waterproof coatings are essential to prevent water damage and maintain the foundation’s integrity. If you’re considering a CMU block foundation, consulting with a structural engineer or foundation specialist is recommended to ensure it’s appropriately designed for your specific soil and climate conditions.
FIELDSTONE
Stone foundations, commonly found in older homes and historic properties, are particularly prevalent in areas where stone was readily available on-site. While these foundations are known for their durability and charm, they are also susceptible to moisture penetration and require regular maintenance.
In Massachusetts, fieldstone foundations should be inspected annually to identify any signs of deterioration. Over time, neglecting proper maintenance can lead to issues such as bowing, bulging, shifting, or settlement. If you observe any of these structural concerns, it’s essential to contact an experienced mason promptly to assess and repair the damage.
However, if the stones remain in their original placement and the surface is generally intact, many minor repairs and maintenance tasks can be handled by determined do-it-yourselfers. Routine restoration efforts, such as repointing mortar joints, sealing cracks, and addressing minor water infiltration, can significantly extend the life of your foundation. With consistent care, a well-maintained stone foundation can continue to support your home for many years to come.
Most fieldstone foundations originally had a thin layer of mortar coating applied to the face of the stones. This coating helped secure the stones in place and provided a smoother, more uniform appearance. However, over time, exposure to moisture causes the mortar to deteriorate and flake away, eventually revealing the stones beneath. As the deterioration progresses, water infiltration can further damage the mortar joints. The result is often noticeable as small piles of gray sand accumulating on the basement floor — a clear sign of crumbling mortar. When this occurs, tuckpointing is necessary to refill the voids left by the eroded mortar. Proper tuckpointing not only restores the structural integrity of the foundation but also helps prevent further moisture intrusion.
If your fieldstone foundation is experiencing water seepage, it’s crucial to resolve any exterior drainage issues before attempting any foundation repairs. Ensure water is directed away from your home using properly functioning gutters, downspouts, and a well-graded landscape.
If seepage persists even after addressing drainage, it may be time to consider installing a basement waterproofing system around interior perimeter of the basement. From my experience, these systems are highly effective in keeping basements dry. They work by capturing and redirecting water before it can rise to the floor level, channeling it to a sump pump for removal. With proper installation and regular maintenance, a B-Dry system can provide reliable, long-lasting protection against water infiltration, giving you peace of mind and a dry basement. To ensure long-term success, it’s essential to maintain and routinely test your sump pump. Additionally, I strongly recommend keeping a backup sump pump on hand in case the primary pump fails.
Among all the components of a home, the foundation — especially the portion buried below ground — is often the most overlooked. However, maintaining the mortar joints and ensuring they remain intact is essential to the longevity of your foundation. By taking the time to complete proper tuckpointing and applying a protective top coat, you’re reinforcing your home’s structural integrity. With consistent care, your fieldstone foundation has the potential to stand strong for generations to come.
STEPS FOR TUCKPOINTING A FIELDSTONE FOUNDATION
• Carefully scrape away or chip out any loose, crumbling mortar between the stones.
• Create a small, clean cavity or keyway to ensure the new mortar has a strong, lasting bond.
• Avoid the common mistake of applying fresh mortar over old, deteriorated mortar, as this is a temporary fix that will fail within a couple of years.
APPLY NEW MORTAR
• Mix a suitable mortar designed for stone foundations, typically a lime-based mortar which offers flexibility and compatibility with older stone structures.
• Firmly press the mortar into the cleaned-out joints, ensuring it fills all voids.
WORK IN SECTIONS
• To maintain the foundation's stability, only work on one section at a time.
• Avoid removing mortar throughout the entire basement at once, as this can compromise the structural integrity of the foundation.
• Complete the removal, tuckpointing, and any additional surface coating (parging) before moving on to the next section.
The final top coat of mortar applied to a fieldstone foundation doesn’t need to resemble the work of a skilled stone artisan — it simply needs to serve its purpose of securing the newly installed mortar and providing a protective barrier. Think of it as applying frosting to a cake; appearance is secondary to functionality.
By following these steps and conducting routine inspections, you can preserve the strength and longevity of your fieldstone foundation. If the damage is extensive or structural issues are evident, it’s advisable to consult with an experienced mason for professional repairs.
SLAB FOUNDATIONS
A slab foundation is a type of home foundation made of a single, thick layer of concrete poured directly onto the ground. It typically serves as both the foundation and the floor of the house. Unlike other types of foundations, such as basements or crawl spaces, a slab foundation does not have any space beneath.
Slab foundations are uncommon in Massachusetts, but when they are present, they tend to be more modern. They can vary significantly from older slabs, which often lack moisture barriers and reinforcing steel, to newer designs that incorporate both. A common modern type is the post-tension slab, featuring adjustable reinforcing steel and a moisture barrier beneath it. However, distinguishing between slab types can be challenging, as key features like bolt size and spacing are typically concealed.
My inspection of slab foundations adheres to industry standards. I examine the visible portions of the exterior stem walls for any signs of significant cracks or structural deformation. However, I do not move furniture or lift carpeting and padding to inspect for hidden cracks, nor do I use specialized tools or measuring devices to assess relative elevations or determine the degree of differential settling. It is important to note that many slabs are intentionally designed to allow slight movement. Most people wouldn't notice any unevenness until there is a difference of more than one inch over a span of twenty feet, a variation generally considered acceptable by most authorities.
Interestingly, many slabs reveal cracks when the carpet and padding are removed, but there are no definitive standards for evaluating them. Generally, cracks less than 1/8 inch wide with no significant vertical or horizontal displacement are not considered structurally concerning. These cracks are often caused by normal concrete shrinkage, but they can also result from a poor concrete mixture, age-related deterioration, adverse soil conditions, or inadequate drainage. If left unsealed, they may allow moisture to enter your home, particularly if it is situated on a hill or slope, or if downspouts discharge near the slab.
In the absence of major defects, I may not recommend consulting a structural engineer or foundation contractor. However, you are always welcome to seek a second opinion if you have any concerns. Additionally, the condition of utility lines — including drainage, water, gas, electric, and cable — that run in, under, or through slab-on-grade foundations cannot be assessed during a standard home inspection due to their inaccessibility.
BRICKS
A brick foundation is a type of foundation constructed using bricks instead of concrete or stone. It was commonly used in older homes, particularly before modern concrete block or poured concrete foundations became widespread. You might find brick foundations in historic homes or structures built before the mid-20th century. Brick foundations are durable and offer a classic aesthetic appeal. However, they are less commonly used in today's modern construction due to their higher material and labor costs. Today, if a foundation is not made of poured concrete, it is likely constructed from concrete blocks. Despite their differences, brick and block foundations share a common characteristic — both are held together using mortar, a mixture of sand and cement.
Over time, mortar joints can deteriorate, leading to cracks and crumbling. Not only are damaged mortar joints unsightly, but they also compromise the structural integrity of the foundation and allow water to penetrate behind the brick, potentially causing significant damage. To prevent this, consider tuck-pointing — a process that involves removing the damaged mortar by surface scraping to create a keyway and then replacing it with fresh mortar. It's important to inspect your brick foundation periodically and address any visible deterioration promptly. If the damage is extensive, such as across an entire foundation wall, it's best to hire a professional mason to ensure the job is done safely and effectively.
Here is what my clients have to say about my home inspection services:
Press F5 (on your keyboard) for additional testimonials
Dave,
I want to say THANK YOU for such a thorough and complete home inspection. I am glad I was referred to you and will be passing on that referral to anyone I know that needs a home inspector! THANK YOU!!!
Keith


- Home
- Types Of Home Inspections
- Why Choose Me?
- What Do I Inspect
- Aerial Drone Inspections
- Areas I Serve
- Guide to a Healthy Home
- Higher Standards
- Client Testimonials
- Standards of Practice
- Support Our Military
- Glossary - A thru H
- Glossary - I thru Z
- Purchasing A Home
- Selling Your Home
- Get Your Home Sold Fast
- Know Your Home
- Pricing For Services
- Optional Services
- Most Common Defects
- Frequently Asked Questions
- Home Inspection Report
- Home Maintenance
- Moving Tips
- Images Of Defects
- A Safer Home
- Contact Me
Areas Served
MASSACHUSETTSCities and towns throughout Eastern Massachusetts, primarily focusing on ESSEX, MIDDLESEX, NORFOLK, SUFFOLK, and WORCESTER counties, including:


![]()