Massachusetts Home Inspections YOUR INVESTMENT IS MY CONCERN

Carpenter Bees
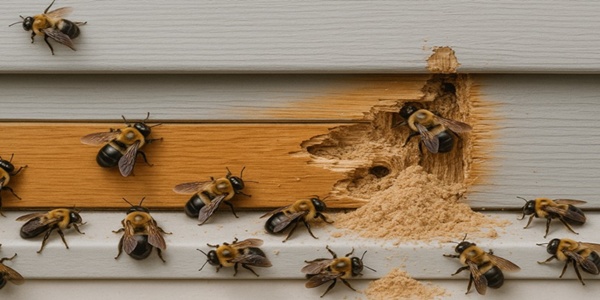
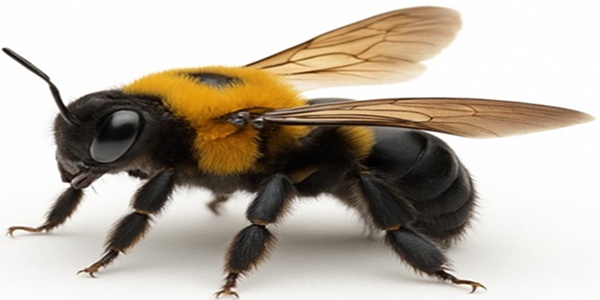
Carpenter bees in Massachusetts are large, black, and yellow, often mistaken for bumblebees due to their similar size and coloration. However, they can be distinguished by their shiny black abdomen, whereas bumblebees have fuzzy yellow hairs covering their abdomen.
These bees are commonly seen in the spring, hovering around the eaves of houses or beneath decks and porch railings. They derive their name from their habit of excavating tunnels in wood using their strong jaws. Unlike termites, carpenter bees—like their distant relatives, carpenter ants—do not consume wood for food. Instead, they burrow into wooden surfaces solely for nesting and breeding. The wood particles they remove are either discarded near the entry hole or repurposed to create partitions within their tunnels.
Carpenter bees can become a nuisance outdoors when they hover erratically around people, often causing fear. While male carpenter bees cannot sting as they lack stingers, female carpenter bees can sting if provoked. However, they are generally docile and unlikely to sting unless directly threatened. You can distinguish males from females by their facial markings — males have a distinctive patch of white cuticle on their face, while females have entirely black faces.
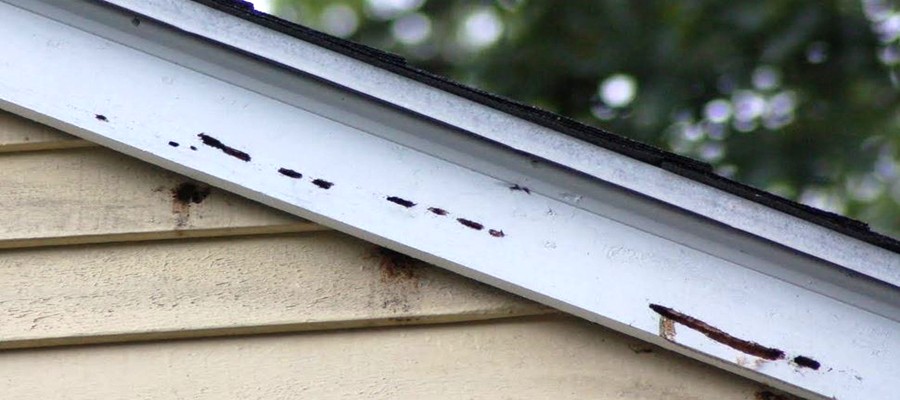
Homeowners often complain not only about the intimidating presence of these bees but also about the round holes they bore into wood trim near eaves, gables, fascia boards, porch ceilings, outdoor wooden furniture, decks, wood siding, and window frames. Although initial damage may be minor, carpenter bees may expand old tunnels and create new ones over time, leading to significant structural damage. Additionally, the yellow, coarse sawdust from their excavations, often mixed with their waste, can leave unsightly stains beneath entry holes.
Carpenter bees create nearly perfect circular entry holes measuring 3/8 to 1/2 inch in diameter (see images below). After boring a short entrance tunnel, the female turns at a 90-degree angle and excavates a channel that can range from 6 inches to as long as 4 feet. This main corridor serves as the foundation for smaller chambers, a few inches deep, where she deposits her eggs. Each chamber contains a single egg, along with a mass of pollen to nourish the larvae upon hatching. After sealing the chamber, she repeats this process for each egg, ensuring the next generation's development.
CARPENTER BEE INFESTATION IMAGES
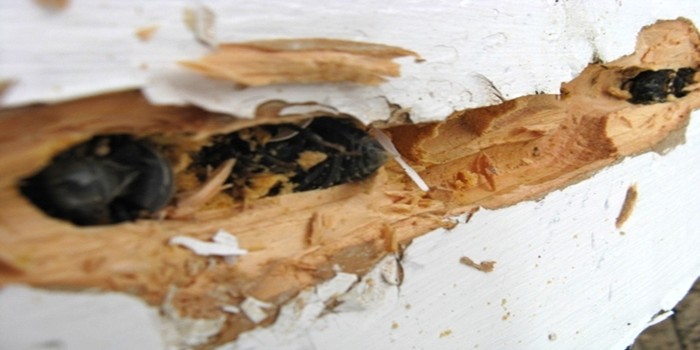
This is a real carpenter bee infestation I encountered on my own property. I'll share some close-up images to give you a clear view of how these bees establish their nests for breeding.
1) After discovering the carpenter bee damage, I carefully removed the outer surface of the wood trim to get a closer look inside the small breeding chambers. The newly hatched bees are clearly visible within their chambers.
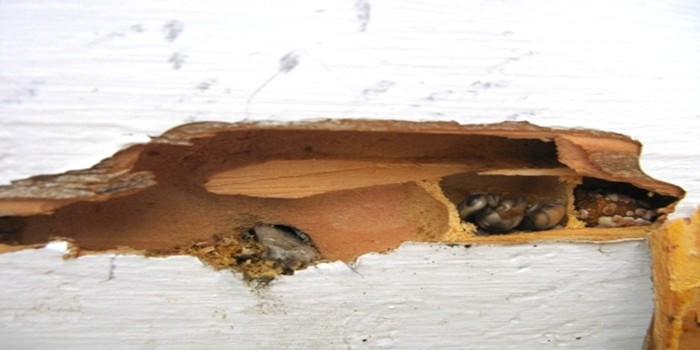
2) Following the bored tunnel, I carefully removed additional layers of wood and discovered two more chambers, each containing newly hatched bees.
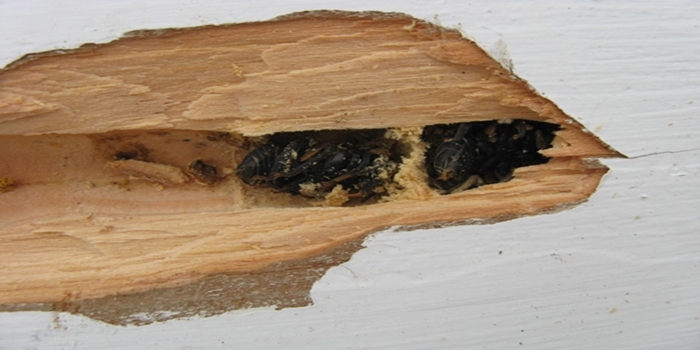
3) As I continue tracing the long bored tunnel, I come across another bee lying on its back.
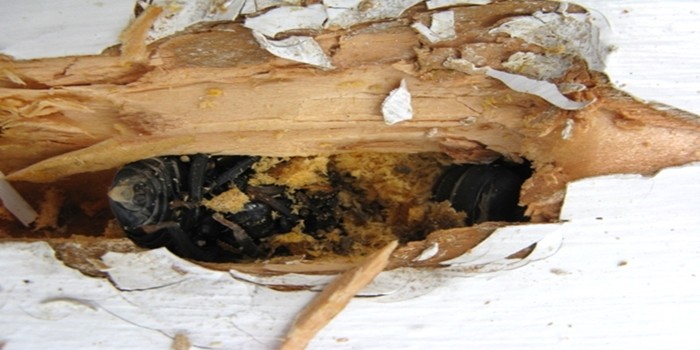
4) Here is the full tunnel with the wood covering removed. This tunnel measured approximately 9 to 10 inches in length.
CARPENTER BEE PREVENTION
Preventing carpenter bee damage is challenging (or nearly impossible) for several reasons. Protective insecticide sprays applied to wood surfaces are only effective for a short time, even when reapplied every few weeks. Since carpenter bees don’t consume the wood, and their activity spans several weeks, they are rarely exposed to lethal doses of pesticide. Additionally, because almost any exposed wood on a house can be targeted by these bees, applying pesticides to all potential sites is often impractical, unsafe, and ineffective. Attempting to spray hovering bees is also not a sensible or safe use of pesticides. Swatting them can often be just as effective.
To minimize the risk of infestation, consider using hardwoods that carpenter bees are less likely to target for nesting. On all buildings, fill any cracks or depressions in wood surfaces to make them less attractive. Regularly paint or varnish exposed surfaces to reduce weathering. If you find unoccupied holes, fill them with steel wool and caulk to prevent reuse, but wait until the bees have emerged before sealing the tunnels. Once filled, repaint or re-varnish the repaired areas. Protect rough spots, like the ends of timbers, with wire screening or metal flashing.


Here is what my clients have to say about my home inspection services:
Press F5 (on your keyboard) for additional testimonials
Hi Dave,
I was very impressed with you on Monday when we met in Peabody . I have never seen a home inspector spend 4 hours doing the most total inspection you did. And not only doing the inspection but educating your client at the same time.
I am sending you a new client, his name is Norman C. He is a good friend of mine. He is buying a house in Wenham on lake street and asked if I knew a "good" home inspector.
I have seen a lot of home inspectors over the years. The general contractor who couldn't make it on his own and thought that being a home inspector was another way of making money. But, all the while feeding his bad information along with his bad practices. David, your not that guy. I put you in the top 5% of all the home inspectors I've seen in the past 25 years. Well done!
David Carnevale
Owner 1-800-PLUNGER








- Home
- Types Of Home Inspections
- Why Choose Me?
- What Do I Inspect
- Aerial Drone Inspections
- Areas I Serve
- Guide to a Healthy Home
- Higher Standards
- Client Testimonials
- Standards of Practice
- Support Our Military
- Glossary - A thru H
- Glossary - I thru Z
- Purchasing A Home
- Selling Your Home
- Get Your Home Sold Fast
- Know Your Home
- Pricing For Services
- Optional Services
- Most Common Defects
- Frequently Asked Questions
- Home Inspection Report
- Home Maintenance
- Moving Tips
- Images Of Defects
- A Safer Home
- Contact Me
Areas Served
MASSACHUSETTSCities and towns throughout Eastern Massachusetts, primarily focusing on ESSEX, MIDDLESEX, NORFOLK, SUFFOLK, and WORCESTER counties, including: