Massachusetts Home Inspections YOUR INVESTMENT IS MY CONCERN

GFCI Receptacles
WHAT IS A GROUND FAULT CIRCUIT INTERRUPTER?
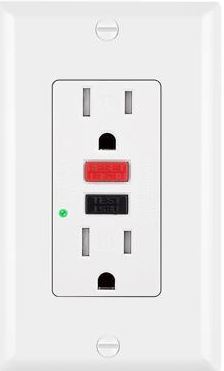
These are receptacles that typically have the black and red test buttons on them (pictured above). GFCI's are found in outlets and service panels. They monitor the flow of current to and from appliances. If there's an imbalance in the flow, because of a frayed wire, a ground fault or a faulty device, current may attempt to travel through you, but the GFCI will quickly cut power to prevent any serious injury. Unless you have an outlet with a Ground Fault Circuit Interrupter (GFCI), you may be seriously shocked or burned because you may be the shortest route to the ground. Although they prevent electrocution, there is still a risk of electric shock.
GFCI Receptacles (Ground Fault Circuit Interrupter) - Safety Receptacles
They are required (by code) in many areas where electricity and water may come into contact. These areas include bathrooms, kitchen receptacles for countertop use within 6 feet of any sink, basements, pools, spas, laundry and utility rooms, garages and all receptacles located on the exterior of the home. At least one GFCI outlet is required in an unfinished basement.
There are GFCI outlets and GFCI-protected outlets which are outlets that are "downstream" of GFCI outlets, meaning that they are on the same circuit as a GFCI outlet, but do not have the red and black buttons on them. If there is no electricity to a GFCI-protected outlet, the GFCI outlet (at a separate location) might have tripped and disconnected electricity to this particular circuit. The reset button must be pressed in order to restore electricity to any downstream outlets.
You should test the GFCI outlets as soon as you move in, noting at the same time any protected outlets that may be present and which GFCI outlets control those protected outlets; typically the protected outlets should be labeled as such. Although they are proven life-saving devices, they are known to fail on a regular basis and should be tested monthly to ensure that they are functioning properly.
To test the GFCI outlet, first plug a nightlight or lamp into the outlet. Turn the light on, and then press the "TEST" button on the GFCI outlet. The GFCI outlet's "RESET" button should pop out, and the light should go out. If the GFCI outlet is functioning properly, meaning that the light does go out, press the "RESET" button to restore power to the outlet. If the "RESET" button pops out but the light does not go out, either the GFCI outlet is not working properly or it is incorrectly wired. Call a qualified electrician to evaluate the problem. Usually the kitchen GFCI outlet will control any other outlets in the kitchen (sometimes more than one GFCI outlet is present in the kitchen). Sometimes all the bathroom outlets are placed on the same circuit, with only one GFCI outlet protecting the outlets in all the bathrooms. Occasionally a GFCI outlet in the garage will protect outlets in various bathrooms. Such garage installations can be inconvenient, particularly in multi-story buildings.
If GFCI outlets trip regularly, consult a qualified electrician immediately to determine why the tripping is occurring. GFCI outlets trip quite often when hair dryers are used on the circuit due to the electricity surge typically needed to start the dryer. If you notice this happening, try starting the dryer on the lowest setting and then moving up to the higher setting after a few seconds. If your circuit continues to trip, consult a qualified electrician for further evaluation.
SAFETY COMES FIRST... If you feel totally confident in replacing the grounded outlets yourself, I will explain how you can do this project properly without hiring a licensed Electrician. But, if electricity and it's components are projects that you'd rather not touch or if there are numerous outlets that need upgrading, I'd highly recommend you hire a licensed Electrician to perform this upgrade for you.
HOW TO PROPERLY REPLACE A GROUNDED OUTLET WITH A GFCI OUTLET
Before starting, make sure the breaker (power) to this ungrounded outlet is shut down. Do not assume that the markings on your service panel are correct. Double-check that the power is shut down by plugging in a small appliance and turning it on. Once the power is off at this circuit, start by removing the screws from the outlet cover. Then remove the upper and lower screws at the outlet itself. Now pull the outlet out of the junction box and unscrew or release the two wires from the outlet. You can throw away this old outlet and the cover. The old two prong outlet cover will not adapt to the new GFCI outlet as it is shaped differently. Now take this opportunity to clean up the receptacle box with your shop vacuum before re-installing the GFCI outlet. Also, tape up any frayed or nicked wires with electrical tape (if the wires are badly deteriorated, you may have to trim them back or replace them with new wire). Now confirm that you have enough room in the box for the new GFCI by gently pushing the wires back in the box and test fitting the new GFCI. If the GFCI doesn't fit because there are too many wires in the box or the box is too small, you would have to have an Electrician install a new, larger junction box. At this point, your electrician can complete the job of installing your GFCI outlet.
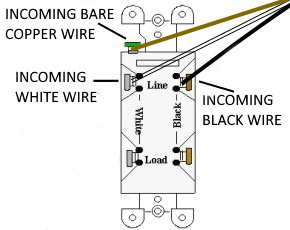
Start the GFCI install by using needle nose pliers to bend the ends of the two existing wires into a u-shape, so they can fit snugly under each outlet screw. Todays newer receptacles contain inserts for the wiring and do not need to be bent into a u-shape. The wires simply slide right into the provided openings. Now attach the black wire behind the head of the brass/gold screw then tighten up that screw to hold wire in place, then attach the white wire behind the head of the silver screw and tighten this screw to hold that wire in place, then attach the bare wire behind the head of the green screw, then tighten up that screw. Now gently fold back the wires into the electrical box while pushing the GFCI outlet inside the junction box to sit the flat brackets flush against the top and bottom of the box. You can now install the top and bottom screws to the outlet.
You should not have to force this outlet in. If you find yourself forcing the outlet to fit, then gently pull it out again and reorganize the wires and try it again. If you’re still forcing wires inside the box, then you need to cut the wires shorter. Forcing an outlet may damage the wires and can pull them away from their outlet connections. Once you have the GFCI properly seated and screwed in, you can now screw the new GFCI outlet cover in place. Now the breaker to this circuit can be placed in the “On” position. You should now have a GFCI protected outlet that is SAFER but not grounded. REMEMBER: This outlet should always be labeled "NO EQUIPMENT GROUND" since the ground connection is left unconnected.
See Also:
Here is what my clients have to say about my home inspection services:
Press F5 (on your keyboard) for additional testimonials
Hi Dave,
I just wanted to write and thank you very much for doing our inspection today. You really took an awful lot of extra time to explain things to us. It was a huge help and by far my favorite part of this whole home-buying process. In addition to drawing our attention to the major projects that need to be undertaken right away or in the near future, I was glad that you were also so thorough as to point out smaller things and provide suggestions for fixes that we'd be able to do ourselves. Thanks again for all your effort. I'm finding your "Know Your Home" book a great source of information along with your report. I'll no doubt have some questions for you at some point and really appreciate your willingness to answer them. Have a great rest of your weekend!
Take care,
Sean


- Home
- Types Of Home Inspections
- Why Choose Me?
- What Do I Inspect
- Aerial Drone Inspections
- Areas I Serve
- Guide to a Healthy Home
- Testimonials
- Higher Standards
- Standards of Practice
- Glossary - A thru H
- Support Our Military
- Glossary - I thru Z
- Purchasing A Home
- Selling Your Home
- Know Your Home
- Pricing For Services
- Optional Services
- Most Common Defects
- Frequently Asked Questions
- Home Inspection Report
- Home Maintenance
- Moving Tips
- Images Of Defects
- A Safer Home
- Contact Me
- Site Map
Areas Served
MASSACHUSETTSCities and towns throughout Eastern Massachusetts, primarily focusing on ESSEX, MIDDLESEX, NORFOLK, SUFFOLK, and WORCESTER counties, including:


![]()