Massachusetts Home Inspections YOUR INVESTMENT IS MY CONCERN

Cracked Surfaces
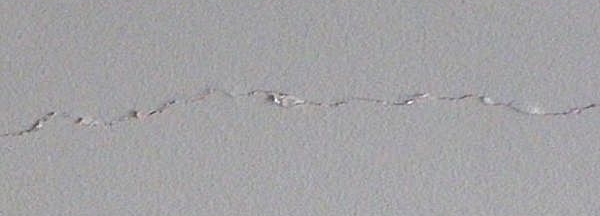
The most common cracks in Massachusetts homes are typically (but not always), defined as hairline cracks less than one-eighth inch wide or less than twelve inches in length. Almost by definition... concrete, plaster, drywall and stucco will absolutely crack, simply because the material shrinks and it cracks as it dries, cures, and ages. Common cracks in these materials are also called shrinkage cracks. Common cracks can appear at any time in the life of a typical structure, typically running diagonally from the top outside corners of door and window openings where they typically are of least concern.
Major cracks are typically defined as more than one-eighth inch wide, more than twelve inches in length, excessive in number, unusual (stair-step, V or X shaped, a straight horizontal, displaced at either side of crack or a straight vertical), or in unusual locations (such as the middle of a wall with no doors or windows nearby). If major cracks are present or appear, you should seek additional evaluation from a qualified structural engineer specializing in foundations and structures. Some major cracks usually occur simply due to homeowner neglect and ignorance about how to take care of the cracks when they are much smaller common cracks. In other words, a common crack or fracture can become a major crack if it is simply ignored. Cracks and areas around all cracks should be repaired and monitored on a regular basis, especially during periods of rain and freezing weather and any additional damage should be evaluated by a qualified structural engineer.
If you are unfamiliar with common cracks, you should seek the specialized services of a qualified structural engineer for further evaluation and information. Major settlement cracks, particularly in the foundation, walls, ceilings, and/or attached porches/patios, should be inspected BEFORE CLOSE OF ESCROW to help protect your investment in this piece of real estate. Major settlement cracks in driveways, walkways, and other areas typically are more cosmetic than of a critical failure nature but should still be evaluated by a qualified professional. I highly recommend repair and/or replacement of affected components and regular monitoring and maintenance to seal and weatherproof all cracks to help prevent any additional damage and accelerated deterioration. Although you might be willing to accept a house with more than its fair share of common and major cracks in various areas, the person who seeks to purchase your house somewhere down the road may not be so accepting, thereby leaving you to make repairs then, at which time additional damage might have occurred due to your ongoing neglect. It is in your best interest to take care of both common and major cracks as soon as you notice them.
OLD PLASTER WALL CRACKS
If you have ever owned an older home in Massachusetts, you must surely be aware of the many pluses and minuses of plaster walls. Their durability, smoothness, sound deadening qualities and their sheer mass make them very attractive. The only negative aspect of a plaster walls is that they tend to react like glass when subjected to stress. In other words, plaster will crack (eventually) and may become loose over time. Plaster damages are a common occurrence and are almost impossible to completely repair with a simple patch that homeowners are used to seeing with drywall patching. There are several different repairs for those unsightly plaster damages, but (in my personal opinion) any repair to plaster is simply a temporary repair as plaster will always be subjected to damage and it becomes loose over the years. Continuously repairing these areas will become periodic and will get quite tiresome. Remember… when a piece of plaster breaks off, it usually loosens all of the surrounding plaster from its lath. So, generally you have to replace all the plaster that is within 6-12" from the visible hole in order to reach the plaster that is still keyed (holding) into the lath tightly.
Plaster can be damaged from the normal stresses and strains of people living in an older house: holes from artwork hung on the wall, scratches from furniture, kids playing and hitting the walls and spilled liquids on floors above that will seep down through to the plaster ceilings. In addition, water damage from a roof or plumbing leaks will soften the hard plaster keys and cause it to come loose from the lath and any excessive damage to plaster can form a belly like appearance. Some older plaster is of poor quality, and this also may cause the plaster to crack and crumble.
There are are all sorts of options when it comes time to upgrading plaster walls and I would like to share those options with you.
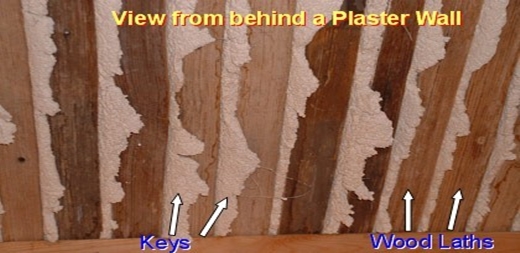
First of all...Viewing from behind a typical plaster wall, you can see that plaster was applied to wood laths and held in place by the keys that form when it squeezes through the wood laths. Over time, these keys will disintegrate and cause plaster walls and ceilings to crack, crumble, and fall away from the lath area. Any settling of a house can speed this process.
MINOR PLASTER CRACK REPAIRS
Minor plaster wall cracks are a common occurrence and are almost impossible to repair with a simple patch that homeowners are used to seeing with drywall patching. For those unsightly plaster cracks that always seem to occur in the older buildings, I highly recommend using NU-WAL. This is a DO-IT-YOURSELF project that consists of a fine textured fiberglass mat that is embedded in an elastomeric adhesive. The strong acrylic binder will create a surface that resists future impacts and abrasions. This simple application over your old cracked plaster walls will totally conceal the damages and will help stabilize and strengthen the entire wall surface. Once this material is applied and it dries, you're able to paint or wallpaper right over it.
MAJOR PLASTER CRACK REPAIRS
When you have badly damaged plaster walls you have two choices...
1) Remove all plaster and laths right down to the studs or joists. This is going to require very labor intensive work and the work area will become very dirty and dusty. Start by laying a painter’s floor cloth (or similar material) on the floor in order to make your clean up process much easier. Small portions of plaster can be carried outside (on these cloths) and dumped into your disposal vehicle/dumpster. After all the plaster and wood laths are removed from the walls or ceilings and the area is cleaned up and swept, all the dirty work is completed. You can now start fresh with a normal drywall installation.
Before you start hanging the drywall, you need to make sure all studs are spaced close to today’s standard of 16 inches on center. Most of the older homes will have studs spaced anywhere from 16 to 36 inches on center. Anything over 16 inches is too wide, so installing additional studs between the existing studs will give you a stronger wall. Workers undertaking demolition should wear OSHA-approved masks because the plaster dust that floats into the air may contain decades of coal soot and lead from lead based paint. Long-sleeved clothing and head-and-eye protection should always be worn. Asbestos, used in the mid-twentieth century as an insulating and fireproofing additive, may also be present and OSHA-recommended precautions should always be taken.
2) Simply leave the damaged plaster in place and conceal the damaged walls or ceilings with ¼” drywall. The walls will not be perfectly straight and flat the way you’d like them to be, but the upgrade process is much easier. You will start by removing all wood trim from the outside edges of every wall, ceiling and window in the room so the reveals around these areas will not become too thin. If there are walls that are loose or bulging, then you’ll need to apply special plaster washers to these areas in order to secure the damaged plaster to the laths.
If you’re upgrading a plaster ceiling and any portion of the ceiling is sagging, then you need to remove all the sagging areas and simply fill the voids with sections of drywall. Applying sheets of drywall over sagging ceilings is very dangerous as it will only cause the drywall covering to continue sagging due to the weight of the plaster. In a worse case scenario, the ceiling will fall. Once all plaster is secure and the voids are filled, you’re now ready to apply drywall sheets over every plaster wall or ceiling by properly securing it with drywall screws to the studded areas only.
Try to avoid screwing into the laths as these will not hold the drywall securely. After the drywall is completely installed throughout the room, you are now ready for the finish work. If you have no experience with joint compound and sanding at drywall seams, then do yourself a favor and hire a drywall professional to apply and sand the joint compound areas for you. If joint compound is not applied and sanded in a professional manner, then the shoddy work will become visible when you finally apply the paint. By then, it’s too late and you have to live with those wavy scratched surfaces that were not visible before you applied the paint.
If the plaster walls are slightly wavy or oddly textured, you may want to apply a highly textured wall covering, such as Lincrusta or Anaglypta. The busy pattern and deep texture can hide many imperfections and looks great when applied properly. Good luck on your renovation.
Here is what my clients have to say about my home inspection services:
Press F5 (on your keyboard) for additional testimonials
Dave,
I want to say THANK YOU for such a thorough and complete home inspection. I am glad I was referred to you and will be passing on that referral to anyone I know that needs a home inspector! THANK YOU!!!
Keith


- Home
- Types Of Home Inspections
- Why Choose Me?
- What Do I Inspect
- Aerial Drone Inspections
- Areas I Serve
- Guide to a Healthy Home
- Testimonials
- Higher Standards
- Standards of Practice
- Glossary - A thru H
- Support Our Military
- Glossary - I thru Z
- Purchasing A Home
- Selling Your Home
- Know Your Home
- Pricing For Services
- Optional Services
- Most Common Defects
- Frequently Asked Questions
- Home Inspection Report
- Home Maintenance
- Moving Tips
- Images Of Defects
- A Safer Home
- Contact Me
- Site Map
Areas Served
MASSACHUSETTSCities and towns throughout Eastern Massachusetts, primarily focusing on ESSEX, MIDDLESEX, NORFOLK, SUFFOLK, and WORCESTER counties, including:


![]()